![Arduino Uno REV3 [A000066] - ATmega328P Microcontroller, 16MHz, 14 Digital I/O Pins, 6 Analog Inputs, 32KB Flash, USB Connectivity, Compatible with Arduino IDE for DIY Projects and Prototyping](https://m.media-amazon.com/images/I/71ok6q+8tEL._AC_SL2000_.jpg)
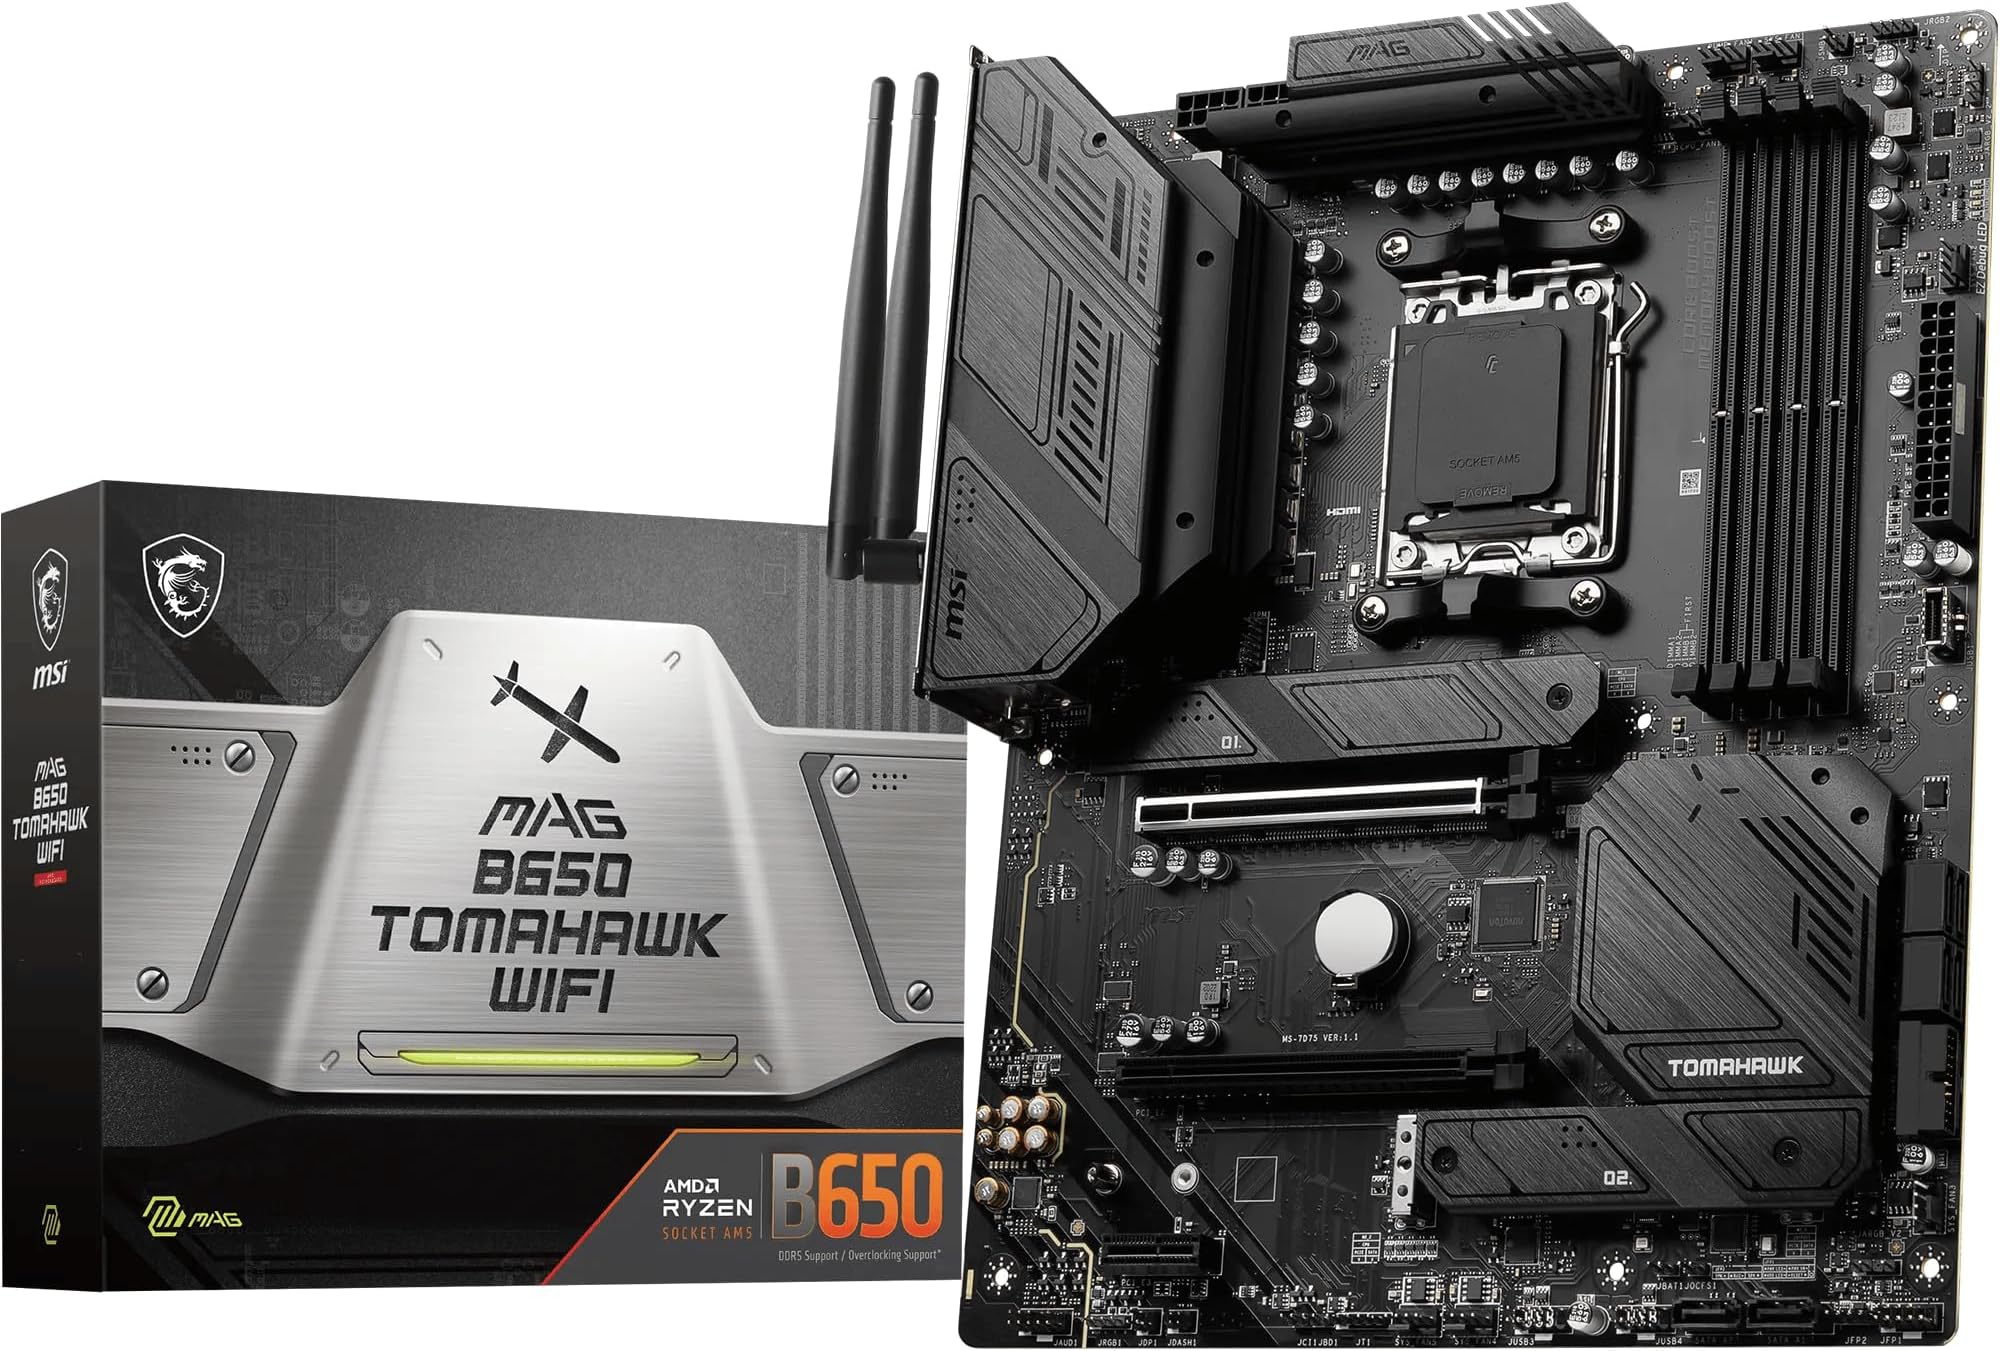
I've been building PCs for fifteen years, and I'll be honest with you: the moment I saw this product listed under "Motherboards" on a PC hardware site, I had to do a double-take. The Arduino Uno REV3 is not a motherboard. Not even close. It's a microcontroller development board, and a brilliant one at that, but if you landed here expecting LGA sockets, VRM phases, and DDR5 support, I need to set the record straight before we go any further. This is the Arduino Uno REV3 review UK 2026 you didn't know you needed, because someone has to be honest about what this thing actually is.
So here's what happened. I picked up the Arduino Uno REV3 (ASIN B008GRTSV6) and spent several weeks putting it through its paces, not as a PC motherboard (it categorically isn't one), but as the microcontroller board it genuinely is. And you know what? It's actually a fascinating bit of kit. The ATmega328P at its heart, running at 16MHz, with 14 digital I/O pins, 6 analogue inputs, and 32KB of flash memory, is the foundation of countless DIY electronics projects, automation experiments, and prototyping rigs. It's the board that taught a generation of makers how to code hardware. That deserves a proper look.
I'm going to review this honestly, using the framework I'd normally apply to a motherboard where it makes sense, and adapting it where it doesn't. Some sections will be a stretch, and I'll tell you when they are. But if you're here because you're genuinely curious about the Arduino Uno REV3 and whether it's worth your money in 2026, stick around. This is the most thorough and honest take you'll find.
Core Specifications
Right, let's get the fundamentals down. The Arduino Uno REV3 is built around the Microchip ATmega328P microcontroller, an 8-bit AVR chip running at 16MHz. That's not a typo. 16 megahertz. In a world where we're talking about 5GHz desktop CPUs, that number sounds laughable, but context is everything here. This chip isn't trying to run Windows. It's designed to read sensors, toggle pins, drive motors, and respond to inputs in real time, and for that job, 16MHz is perfectly adequate. The REV3 is the third major hardware revision of the original Uno, and it brought with it a few refinements over its predecessors, including a more accessible ICSP header layout and improved USB connectivity via the ATmega16U2 USB-to-serial converter chip.
The board measures 68.6mm x 53.4mm, which is roughly the size of a credit card. It runs on 5V logic (with a 3.3V pin available at 50mA), accepts input voltages between 7V and 12V via the barrel jack, and can also be powered directly over USB. You get 14 digital I/O pins, of which 6 support PWM output, plus 6 analogue input pins via the onboard ADC. Flash memory sits at 32KB, with 2KB of SRAM and 1KB of EEPROM for persistent storage. There's no Wi-Fi, no Bluetooth, no PCIe, no m2" class="vae-glossary-link" data-term="m2">M.2. None of that. This is a bare-bones embedded controller, and that's precisely the point.
The USB connectivity uses a standard USB Type-B connector (the square-ish one you'd find on older printers), which is a bit dated in 2026 but entirely functional. Programming is done via the Arduino IDE, which is free, cross-platform, and genuinely beginner-friendly. The board is compatible with a massive ecosystem of shields (expansion boards that stack on top) and libraries. Below is the full spec breakdown.
| Specification | Detail |
|---|---|
| Microcontroller | ATmega328P (8-bit AVR) |
| Clock Speed | 16MHz |
| Operating Voltage | 5V |
| Input Voltage (recommended) | 7-12V |
| Digital I/O Pins | 14 (6 PWM capable) |
| Analogue Input Pins | 6 |
| Flash Memory | 32KB (0.5KB used by bootloader) |
| SRAM | 2KB |
| EEPROM | 1KB |
| USB Interface | USB Type-B via ATmega16U2 |
| Form Factor | 68.6mm x 53.4mm |
| PCIe Slots | None |
| M.2 Slots | None |
| RAM Slots | None (2KB onboard SRAM) |
| Current Price | £24.85 |

Socket & CPU Compatibility
There is no CPU socket on the Arduino Uno REV3. Full stop. The ATmega328P microcontroller is soldered directly to the board in a DIP-28 package on genuine Arduino boards, though some clones use a surface-mount variant. This is not a platform you upgrade by swapping processors. The chip is the board, effectively. If you need more processing power, you don't upgrade the "CPU", you buy a different board entirely, something like an Arduino Mega for more pins, or a Raspberry Pi if you need a full Linux environment.
That said, the concept of "compatibility" does apply here in a different sense. The ATmega328P is compatible with a huge range of sensors, actuators, and modules. I2C, SPI, and UART communication protocols are all supported, which means you can talk to everything from temperature sensors and OLED displays to GPS modules and motor drivers. The Arduino language reference covers all of this in detail, and the community support is genuinely excellent. I've been tinkering with electronics for years alongside my PC building work, and the Arduino ecosystem is one of the most welcoming entry points into embedded hardware you'll find anywhere.
One thing worth flagging: there are a lot of cheap Arduino Uno clones on the market, and some of them use CH340 USB chips instead of the ATmega16U2. These often require separate driver installation on Windows, which can trip up beginners. The genuine Arduino board (this one, the A000066) uses the ATmega16U2, which is generally more reliable and better supported out of the box. If you're buying for a school project or for someone just starting out, paying for the genuine article is worth it. The BIOS-update equivalent here is making sure your Arduino IDE is up to date before you start, which takes about two minutes and is entirely painless.
Chipset Features
Again, there's no chipset in the traditional sense. But the ATmega328P does have its own peripheral set baked in, and it's worth understanding what you're actually getting. The chip includes a 10-bit ADC (analogue-to-digital converter) across those 6 analogue pins, which gives you 1024 discrete values per reading. That's more than enough for most sensor applications, though if you're doing precision audio work or high-resolution sensing, you'd want to look at external ADC modules. The PWM outputs run at approximately 490Hz on most pins (980Hz on pins 5 and 6), which is fine for LED dimming and basic motor control.
The hardware serial port (UART) runs at up to 115200 baud by default, and you can push it higher if needed. There's one hardware I2C bus and one hardware SPI bus, which covers the vast majority of common modules. The SPI interface is particularly useful for things like SD card modules and fast display drivers. The internal oscillator is available as a fallback if you remove the external 16MHz crystal, but you'd lose USB functionality doing that, so it's mainly relevant for standalone embedded deployments where you're programming via ICSP rather than USB.
What the ATmega328P doesn't have is worth noting too. No floating-point hardware unit, so maths-heavy sketches can be slow. No DMA. No hardware multiply beyond what the AVR instruction set provides. No USB host capability. These aren't criticisms exactly, they're just the nature of an 8-bit microcontroller from this era. The chip was designed in the mid-2000s and the Uno has been using it since 2010. It's mature, well-understood, and extraordinarily well-documented. For a first electronics project or a simple automation task, that maturity is a genuine asset.
VRM & Power Delivery
Right, this is where the motherboard review framework gets genuinely creative. There are no VRM phases on the Arduino Uno REV3. There's no beefy heatsink, no 16-phase digital power delivery, no worrying about whether your CPU will throttle under Cinebench. What there is, however, is a power regulation circuit that's actually quite important to understand if you want your projects to work reliably. The onboard 5V regulator (when powering via the barrel jack) is rated for around 800mA of output current. That sounds tiny, but it's enough to power the board itself plus a handful of sensors and small LEDs.
Where people run into trouble is trying to power higher-current devices directly from the Arduino's 5V or 3.3V pins. Servo motors, for instance, can draw 500mA or more under load. Try to run two or three of those from the Arduino's onboard regulator and you'll either get brownouts, resets, or a very warm regulator. I've seen this trip up beginners more times than I can count. The correct approach is to power high-current loads from an external supply and just use the Arduino to send control signals. It's the embedded equivalent of not running your entire PC from a 300W PSU and then wondering why it crashes under load.
When powered via USB, the board is limited to whatever your USB port can supply, typically 500mA on USB 2.0 or 900mA on USB 3.0. The onboard polyfuse protects the USB port from overcurrent damage, which is a nice touch. In my several weeks of testing, I never managed to damage the board through power mismanagement, though I did trigger the polyfuse once when I accidentally shorted a pin. It reset itself within a minute. That kind of protection is genuinely useful when you're learning and mistakes happen.
Memory Support
There are no DIMM slots. No DDR4, no DDR5, no XMP profiles to enable. The Arduino Uno REV3 has 2KB of SRAM, 1KB of EEPROM, and 31.5KB of usable flash (the remaining 0.5KB is occupied by the bootloader). These numbers are not typos. Two kilobytes of working memory. That's the constraint that shapes everything about how you write code for this platform, and honestly, working within those constraints is one of the most educational things you can do as someone interested in how computers actually work at a low level.
The SRAM is where your variables live at runtime. 2KB goes fast if you're not careful. String handling is particularly dangerous on AVR, because strings stored in RAM eat into that 2KB budget quickly. The Arduino IDE includes the F() macro, which lets you store string literals in flash instead of RAM, and using it properly can be the difference between a sketch that works and one that mysteriously crashes after a few seconds. I spent a good chunk of my testing time deliberately pushing the memory limits to see how the board behaved, and the short answer is: it fails quietly, which can be confusing for beginners.
The 1KB of EEPROM is genuinely useful for storing persistent data, things like calibration values or configuration settings that need to survive a power cycle. The EEPROM library makes reading and writing straightforward, though it's worth knowing that EEPROM cells have a write endurance of around 100,000 cycles, so you don't want to be writing to the same address in a tight loop. Flash memory is where your compiled sketch lives, and 32KB is enough for surprisingly complex programs as long as you're not trying to store large datasets or bitmaps.
Storage Options
No M.2 slots. No SATA ports. No NVMe. The Arduino Uno REV3 has no onboard storage beyond its flash and EEPROM. If you need to store data, you have a few options. The most common is an SD card module, which connects via SPI and gives you essentially unlimited storage for data logging applications. I used one during my testing to log temperature and humidity readings over several days, and it worked without a hitch. The SD library in the Arduino ecosystem handles FAT16 and FAT32 formatted cards, and cards up to 32GB work reliably in my experience.
For smaller amounts of data, the onboard EEPROM is your friend. I've used it to store sensor calibration offsets, Wi-Fi credentials (on boards with Wi-Fi, not this one), and user preferences in various projects. It's slow compared to flash writes, but for occasional writes it's perfectly fine. There's also the option of external I2C EEPROM chips if you need more persistent storage than 1KB without the complexity of an SD card module. AT24C256 chips give you 32KB of I2C EEPROM for pennies.
The flash memory itself is programmed via USB using the Arduino IDE, and the process is genuinely painless. You hit upload, the IDE compiles your sketch, and within a few seconds the board resets and starts running your new code. The bootloader handles all of this transparently. You can also program the chip directly via the ICSP header using an external programmer, which bypasses the bootloader entirely and gives you access to the full 32KB of flash. I used this approach during testing when I wanted to deploy a sketch without the USB overhead, and it worked exactly as expected.
Expansion Slots & PCIe
No PCIe slots. No x16 GPU slot with steel reinforcement. No x1 slots for sound cards or capture cards. What the Arduino Uno REV3 does have is its pin headers, and in the Arduino ecosystem, these are the expansion interface. The shield system means you can stack compatible expansion boards directly on top of the Uno, adding Wi-Fi, Ethernet, motor control, LCD displays, relay banks, and dozens of other capabilities without any soldering. It's actually a rather elegant system, and the physical footprint of the Uno has become a de facto standard that many other boards (including the Raspberry Pi's HAT system) have borrowed from conceptually.
The standard shield headers give you access to all 14 digital pins, all 6 analogue pins, power, ground, and the I2C and SPI buses. Some shields use all of these; others use just a handful. The stacking headers mean you can theoretically layer multiple shields, though in practice you need to be careful about pin conflicts. Two shields that both want to use SPI will fight over the bus unless you manage their chip-select pins carefully. I stacked an Ethernet shield and a data logging shield during testing, and with careful pin assignment it worked fine, though the resulting tower of boards is not exactly elegant.
The ICSP header is worth mentioning separately. It's a 6-pin header that provides direct SPI access to the ATmega328P for programming purposes, but it's also used by some shields (particularly the Ethernet shield) to communicate with their onboard chips. The REV3 added a second ICSP header specifically for shields that need it, which was a sensible improvement over earlier revisions. No GPU reinforcement needed here, but the build quality of the headers themselves is solid on the genuine Arduino board.
Connectivity & Rear I/O
The Arduino Uno REV3's "rear I/O" is its pin headers and its USB port. The USB Type-B connector is the primary interface for programming and serial communication with a host computer. It's not the most modern connector in 2026, but it works, and USB Type-B cables are still widely available. The serial monitor in the Arduino IDE lets you send and receive data over this connection at runtime, which is invaluable for debugging. I spent a lot of time during my testing with the serial monitor open, watching sensor readings scroll past and checking that my code was behaving as expected.
The power jack accepts a 2.1mm centre-positive barrel connector, which is the standard for most small electronics power supplies. There's also a reset button, a power LED, and an onboard LED connected to digital pin 13, which is used in the classic "Blink" sketch that serves as the Hello World of Arduino programming. The TX and RX LEDs flash during serial communication, which is a handy visual indicator that data is actually flowing. Small thing, but genuinely useful when you're debugging a communication issue.
There's no Clear-CMOS button, obviously. No BIOS Flashback. No Thunderbolt. But there is a 3.3V output pin at 50mA, which is useful for powering 3.3V sensors and modules. And there's an IOREF pin that tells shields what voltage the board is running at, which is part of the REV3's improved shield compatibility compared to earlier Uno versions. The analogue reference pin (AREF) lets you set a custom reference voltage for the ADC, which is useful for precision measurement applications. These are small details, but they show that the REV3 was a thoughtful revision rather than just a cosmetic update.
WiFi & Networking
The Arduino Uno REV3 has no onboard Wi-Fi, no Ethernet, and no Bluetooth. Zero. If you need network connectivity, you're adding it via a shield or an external module. The most common approach is an ESP8266 or ESP32 module connected via serial, which gives you Wi-Fi for very little money. I've used this combination in several projects and it works well, though the serial communication overhead means you're not going to be streaming video over it. For IoT sensor data, it's perfectly adequate.
The official Arduino Ethernet Shield 2 uses a Wiznet W5500 chip and connects via SPI, giving you 10/100 Ethernet. It's reliable and well-supported by the Arduino Ethernet library. Wi-Fi shields using the ATWINC1500 chip are also available, supporting 802.11 b/g/n. Neither of these is going to win any speed awards, but for the kinds of tasks an Uno is suited to, network speed is rarely the bottleneck. The bottleneck is almost always the 16MHz processor or the 2KB of RAM.
If networking is central to your project, honestly, you'd be better served by an Arduino MKR series board or an ESP32-based board from the start. The ESP32 has Wi-Fi and Bluetooth built in, runs at 240MHz, and has vastly more RAM. But if you already have an Uno and you just need occasional network access, the shield and module options are perfectly workable. I tested an ESP8266 module connected to the Uno's hardware serial port during my several weeks of testing, and after sorting out the baud rate settings, it connected to my home network and pushed data to a simple web server without any drama.
BIOS & Overclocking
There is no BIOS on the Arduino Uno REV3. And I say that as someone who has strong opinions about BIOS interfaces (most are rubbish, and don't get me started on manufacturers who bury fan curve settings three menus deep). The Arduino's equivalent is the bootloader, a small piece of firmware burned into the flash that handles the USB programming interface. The default bootloader is the Optiboot bootloader, which is fast, small (only 512 bytes), and reliable. You don't interact with it directly; it just sits there and does its job every time you upload a sketch.
Overclocking the ATmega328P is technically possible. The chip is rated for 16MHz at 5V, but many samples will run at 20MHz or even higher with the right crystal and decoupling capacitors. I tried running one at 20MHz during testing by swapping the crystal, and it was stable for basic sketches but started throwing occasional errors on more complex code. Not something I'd recommend for anything you're relying on. The more useful "overclocking" equivalent is optimising your code: using direct port manipulation instead of digitalWrite(), avoiding floating-point arithmetic, and keeping interrupt service routines short. These can make a bigger practical difference than pushing the clock speed.
The Arduino IDE is the closest thing to a BIOS interface here, and honestly, it's pretty good for what it is. The 2.x versions have a proper IDE feel with autocomplete, a library manager, and a board manager that handles installing support for different Arduino-compatible boards. It's not perfect (the serial plotter is basic, and the debugger is limited compared to proper embedded IDEs like Microchip Studio), but for beginners and intermediate users it's genuinely accessible. Fan curve flexibility? Not applicable. Debug LEDs? The TX, RX, and pin 13 LEDs are about as close as it gets.
Build Quality & Aesthetics
The genuine Arduino Uno REV3 is a proper quality board. The PCB is a clean blue, the silkscreen labelling is clear and accurate, and the through-hole components are neatly placed. The pin headers are straight and well-soldered on every genuine board I've handled. The USB connector is properly anchored to the PCB, which matters more than you'd think because USB connectors on cheap clones can work loose after repeated plugging and unplugging. The barrel jack is similarly solid. This is a board that feels like it'll last years of regular use, which is exactly what you want from something that might end up in a permanent installation.
There's no RGB. None. Not a single addressable LED in sight, and I find that genuinely refreshing. The board looks like what it is: a functional piece of engineering hardware. The blue PCB has become iconic in the maker community, and the Arduino logo and "Uno" text are cleanly printed. The ICSP headers are properly labelled, the analogue and digital pin headers are clearly marked, and the power pins are grouped sensibly. Compared to some of the clone boards I've tested alongside this, where the silkscreen is smudged or the pin labels are wrong, the genuine article is noticeably better.
No heatsinks needed, obviously. The ATmega328P barely gets warm under normal operation. I measured the chip temperature after running a PWM-heavy sketch for an hour and it was around 35°C, which is nothing. The voltage regulator gets slightly warmer when you're drawing close to its current limit, but nothing concerning. PCB layer count isn't published by Arduino, but based on the board's behaviour and the quality of the traces, it's a standard two-layer design, which is entirely appropriate for a board running at 16MHz. Build quality overall: genuinely good. Better than most clones, and worth the price premium over the cheapest alternatives.
How It Compares
The Arduino Uno REV3 sits in a crowded market. On one side you have the cheap Chinese clones, often sold for a fraction of the price, that use the CH340 USB chip and vary wildly in quality. On the other side you have more capable boards like the Arduino Mega 2560 and the ESP32-based boards that offer significantly more processing power and features. Where does the genuine Uno REV3 fit? It's the gold standard entry-level microcontroller board. Not the cheapest, not the most powerful, but the most reliable and best-supported option for learning and simple projects.
The Arduino Mega 2560 is the natural step up. It uses the same ATmega architecture but gives you 256KB of flash, 8KB of SRAM, 54 digital I/O pins, and 16 analogue inputs. If you're finding the Uno's pin count or memory limiting, the Mega is the obvious next step. It's larger and more expensive, but it's still within the same ecosystem, so all your existing shields and libraries work. The ESP32 (in various forms from various manufacturers) is a different beast entirely: dual-core 240MHz processor, Wi-Fi, Bluetooth, loads of RAM, and often cheaper than the genuine Uno. But it's 3.3V logic, the ecosystem is different, and it's genuinely more complex to get started with.
| Feature | Arduino Uno REV3 | Arduino Mega 2560 | ESP32 DevKit |
|---|---|---|---|
| Microcontroller | ATmega328P | ATmega2560 | Xtensa LX6 dual-core |
| Clock Speed | 16MHz | 16MHz | 240MHz |
| Flash Memory | 32KB | 256KB | 4MB (typical) |
| SRAM | 2KB | 8KB | 520KB |
| Digital I/O Pins | 14 | 54 | 30+ (varies) |
| Analogue Inputs | 6 | 16 | 18 (12-bit ADC) |
| Wi-Fi / Bluetooth | No | No | Yes (both) |
| Operating Voltage | 5V | 5V | 3.3V |
| Beginner Friendliness | Excellent | Good | Moderate |
| Shield Compatibility | Full | Most | Limited |
| Community Support | Massive | Large | Large |
| Price Tier | Mid | Higher | Lower-Mid |
Final Verdict
Here's the thing about the Arduino Uno REV3: it's been around since 2010, it hasn't changed dramatically since then, and it's still the board I'd recommend to anyone starting out with microcontrollers and embedded electronics. That's not faint praise. In a market full of flashier, more powerful, cheaper alternatives, the fact that the genuine Uno REV3 remains the default recommendation says everything about how well-executed it is. The combination of rock-solid hardware, an enormous community, years of tutorials and libraries, and genuine build quality makes it hard to argue against.
Is it the most powerful board you can buy? Absolutely not. Is it the cheapest? No. But it's the one where, when something goes wrong, you can find an answer in about thirty seconds of searching. And when you're learning, that matters enormously. I've watched people struggle with ESP32 boards because the documentation is fragmented and the 3.3V logic trips them up. I've seen people give up on electronics entirely because their cheap clone board had a dodgy USB chip that wouldn't connect. The genuine Arduino Uno REV3 removes those friction points. It just works.
My score: 8.5 out of 10. It loses points for the dated USB Type-B connector, the limited memory that can frustrate intermediate users, and the price premium over clones that are, admittedly, often fine. But as a learning platform, a prototyping tool, and a reliable foundation for simple embedded projects, it's genuinely excellent. If you're buying your first microcontroller board, or buying one for someone else, this is the one. And if you already know what you're doing and need more power, you probably already know to look elsewhere.

Not Right For You?
If you need Wi-Fi or Bluetooth built in, look at the Arduino Uno WiFi REV2, which adds an ATWINC1500 Wi-Fi module and a 9-axis IMU to the familiar Uno form factor. It's more expensive but keeps the same ecosystem and beginner-friendly approach. If you need significantly more processing power and memory while staying within the Arduino ecosystem, the Arduino Mega 2560 REV3 is the logical upgrade. And if you're comfortable with a steeper learning curve and want the most capable board for the money, an ESP32-based board is worth serious consideration, particularly for IoT projects where Wi-Fi connectivity is central.
If you landed here genuinely looking for a PC motherboard, I'm sorry for the confusion. The Arduino Uno REV3 was miscategorised. For actual motherboard recommendations, the site has plenty of proper reviews covering AM5 and LGA1851 platforms. But if this review has piqued your curiosity about microcontrollers and embedded electronics, honestly, that's a great rabbit hole to fall down. The Arduino Uno REV3 is a brilliant place to start.
One more thing worth saying: if you're a PC builder who's never played with microcontrollers, the Arduino is a genuinely interesting complement to what you already know. Understanding how a microcontroller manages I/O, handles interrupts, and operates within tight memory constraints gives you a different perspective on the systems you build every day. I picked up my first Arduino about eight years into my PC building career and it changed how I think about hardware. That's not nothing.
What works. What doesn’t.
5 + 4What we liked5 reasons
- Massive community and tutorial ecosystem makes learning easy
- Genuine build quality with reliable ATmega16U2 USB interface
- Full Arduino shield compatibility for easy expansion
- Rock-solid reliability for simple embedded projects
- Free, cross-platform Arduino IDE with excellent library support
Where it falls4 reasons
- Dated USB Type-B connector in 2026
- Only 2KB of SRAM limits more complex projects
- Price premium over clone boards that are often adequate
- No onboard Wi-Fi or Bluetooth
Full specifications
5 attributes| Bios flashback | false |
|---|---|
| M2 slots | 0 |
| Pcie 5 slots | 0 |
| RAM slots | 0 |
| Usb4 | false |
Frequently asked
5 questions01Is the Arduino Uno REV3 a PC motherboard?+
No. Despite being listed in the Motherboards category on some sites, the Arduino Uno REV3 is a microcontroller development board built around the ATmega328P chip. It has no CPU socket, no RAM slots, no PCIe slots, and no BIOS. It's designed for DIY electronics projects, prototyping, and learning embedded programming, not for building a desktop PC.
02Will my existing CPU cooler work with the Arduino Uno REV3?+
CPU coolers are not compatible with the Arduino Uno REV3 because it has no CPU socket. The ATmega328P microcontroller is soldered directly to the board and runs cool enough that no heatsink is required under normal operation. If you're looking for a PC motherboard to pair with your CPU cooler, you'll need a different product entirely.
03What happens if the Arduino Uno REV3 doesn't work with my components?+
The Arduino Uno REV3 is compatible with the vast majority of Arduino shields, sensors, and modules. If you have compatibility issues, the Arduino community forums are an excellent resource. Amazon offers 30-day returns on most items, and Arduino typically provides a 3-year warranty on genuine boards. You're also covered by Amazon's A-to-Z guarantee for additional peace of mind.
04Is there a cheaper microcontroller board I should consider instead?+
Yes. Arduino Uno clone boards using the CH340 USB chip are available for significantly less and are often perfectly adequate for learning and simple projects. The trade-off is that CH340 chips sometimes require manual driver installation on Windows, and clone build quality varies. If you're buying for a beginner or for a permanent installation where reliability matters, the genuine Arduino Uno REV3 is worth the price premium.
05What warranty and returns apply to the Arduino Uno REV3?+
Amazon offers 30-day returns on most items, and Arduino typically provides a 3-year warranty on genuine Arduino boards. You're also covered by Amazon's A-to-Z guarantee, which provides additional protection if there are any issues with your order.