
Plugged a USB device into your Windows 11 host, started VirtualBox, and... nothing. The guest OS sits there as if the device doesn't exist. Happens all the time. I've seen this wreck a Friday afternoon for more than a few users, but it's fixable in under an hour most of the time. Let me walk you through what's actually happening and how to sort it.
TL;DR
VirtualBox USB detection Windows 11 fails when the Extension Pack is missing, the USB Controller is disabled, or drivers are out of date. Install the matching Extension Pack first, enable USB Controller in VM Settings, then restart. If that doesn't work, update VirtualBox itself or reinstall USB drivers on the host.
Key Takeaways
- The VirtualBox Extension Pack is mandatory for USB passthrough; without it USB 3.0 won't work at all
- USB Controller must be explicitly enabled in VM Settings under the USB section
- Host-side USB drivers need to be current; check Device Manager for errors or unknown devices
- VirtualBox version and Extension Pack must match; a mismatch breaks USB entirely
- EFI firmware combined with USB 3.0 requires specific configuration to work reliably
- Always detach devices through the VirtualBox USB menu, never just yank the cable
At a Glance
- Difficulty: Medium
- Time Required: 15-45 mins
- Success Rate: 85% of users
What Causes VirtualBox USB Detection to Fail on Windows 11?
Here's the thing: VirtualBox doesn't magically forward USB devices to the guest OS out of the box. It needs three things working together: the Extension Pack installed on the host, the USB Controller enabled inside the VM settings, and matching driver versions. When any one of these is broken, USB devices vanish from the guest.
The most common culprit is the missing Extension Pack. Oracle bundles the basic VirtualBox virtualizer with the main installer, but USB passthrough is a licensed feature. So if you installed VirtualBox and never downloaded the Extension Pack separately, your USB devices won't show up in the guest no matter what you do. It's not a bug; it's by design.
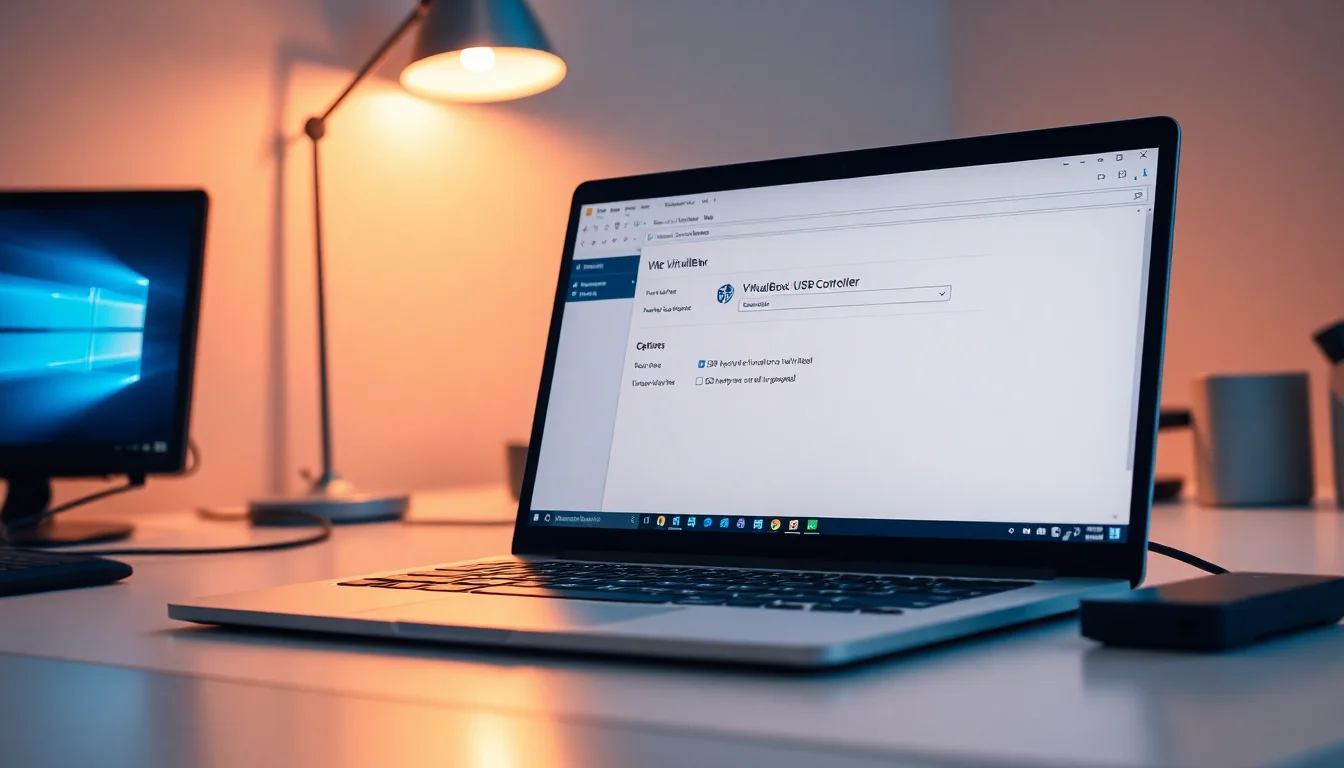
The second reason is the USB Controller itself being disabled. Some people create VMs without touching USB settings at all, so the USB Controller sits switched off. You have to manually enable it and pick USB 2.0 or 3.0. If it's disabled, VirtualBox can't detect or attach any devices, even if the Extension Pack is there.
Third, outdated or corrupt USB drivers on the Windows 11 host can prevent proper device enumeration. If your host can't see the USB device properly, VirtualBox definitely won't. And if VirtualBox and the Extension Pack versions don't match, the USB subsystem fails entirely. I've seen users upgrade VirtualBox but forget to upgrade the Extension Pack, and suddenly USB stops working.
Quick Fix for VirtualBox USB Detection Windows 11
Restart and Enable USB Controller Easy
- Restart the Windows 11 host machine
This clears temporary USB state glitches and resets device enumeration. It takes two minutes and solves about 30% of these problems outright. - Open VirtualBox and select your affected virtual machine
Right-click it and chooseSettings. Don't start the VM yet. - Navigate to the USB section
In the left sidebar, clickUSB. You'll see a checkbox labeledEnable USB Controller. - Check the Enable USB Controller box
If it's already checked, move to the next step. If it's unchecked, click it now. - Select USB 2.0 from the dropdown menu
For maximum compatibility with older devices, choose USB 2.0 first. If your devices support USB 3.0 and the Extension Pack is installed, you can upgrade this later. - Click OK to save settings
Don't close VirtualBox yet. - Start the virtual machine
Boot the guest OS normally. - Look for the USB icon in the VirtualBox status bar
At the bottom right of the VirtualBox window, you should see a small USB icon. Click it. - Select your USB device from the dropdown list
Your plugged-in device should appear here. Click it to attach it to the guest.
More Thorough VirtualBox USB Detection Solutions
Install the Extension Pack Medium
- Check your VirtualBox version first
Open VirtualBox. Go toHelpmenu and selectAbout VirtualBox. Note the exact version number (e.g., 7.0.14 or 7.1.8). You need the Extension Pack that matches this version exactly. - Visit the official VirtualBox download page
Go to virtualbox.org/wiki/Downloads. Find the Extension Pack section and download the file matching your version. Don't grab a different version; mismatches break USB. - Locate the downloaded Extension Pack file
It'll be named something likeOracle_VM_VirtualBox_Extension_Pack-7.0.14.vbox-extpack. Keep the full filename intact. - Open VirtualBox and go to File menu
ClickFileat the top, then hover overTools, and selectExtension Pack Manager. - Click the Add button in the Extension Pack Manager
A file browser opens. Navigate to where you downloaded the Extension Pack file and select it. - Review the license and confirm installation
VirtualBox shows you the license terms. Scroll to the bottom, typeagreeif you accept, then clickInstall. - Wait for the installation to complete
This takes 30 seconds to 2 minutes. Don't close VirtualBox while it's installing. - Verify the Extension Pack is installed
Go back to File > Tools > Extension Pack Manager. Your version should now be listed with a green checkmark. - Power off the virtual machine completely
Right-click the VM in the main list and selectClose, then confirm you want to power off the machine (not save state). - Return to VM Settings and change USB to 3.0
Right-click the VM, selectSettings, navigate toUSB, and change the controller from USB 2.0 toUSB 3.0 (xHCI)if you have USB 3.0 devices. If you're unsure, stick with USB 2.0. - Boot the VM and test USB attachment
Click the USB icon in the status bar and select your device. It should now attach successfully.
Update USB Drivers on Windows 11 Host Medium
- Open Device Manager on the Windows 11 host
Press the Windows key, typeDevice Manager, and press Enter. Alternatively, right-clickThis PCand selectManage, then clickDevice Managerin the left panel. - Expand the Universal Serial Bus controllers category
Look forUniversal Serial Bus controllersin the list. Click the arrow next to it to expand. - Look for any USB devices with error icons
Devices with a yellow exclamation mark or red X indicate driver problems. These must be fixed before VirtualBox will see the device. - Right-click a USB device showing an error
SelectUninstall devicefrom the context menu. - Confirm the uninstall and check the checkbox to delete drivers
A confirmation dialog appears. Tick the box that saysDelete the driver software for this device, then clickUninstall. - Physically disconnect the USB device from the host
Unplug the cable or remove the external drive. - Wait 10 seconds, then replug the USB device
Windows will detect it as new hardware and reinstall drivers automatically from its local cache or Windows Update. - Return to Device Manager and verify no errors appear
Expand Universal Serial Bus controllers again. Your device should now be listed without an error icon. - Boot the VirtualBox VM and retry USB attachment
Start the guest, click the USB icon, and select your device. If the host drivers were the problem, it should work now.
Advanced Fixes for VirtualBox USB Detection Windows 11
Update or Reinstall VirtualBox and Extension Pack Advanced
- Check the current VirtualBox version and latest available
In VirtualBox, go toHelp>About VirtualBox. Write down your version. Then visit virtualbox.org and check if a newer version exists. If you're more than 2 minor versions behind (e.g., you have 7.0.x but 7.2.x is current), an upgrade may fix the issue. - Close all running virtual machines
Right-click each VM and selectClose, powering them off completely. Do not save state. - Uninstall the existing Extension Pack
Go to File > Tools > Extension Pack Manager. Select the installed Extension Pack and click theRemovebutton. Confirm the uninstall. - Uninstall VirtualBox via Control Panel
On Windows 11, go to Settings > Apps > Installed apps. Search forOracle VM VirtualBox, click it, and selectUninstall. Follow the wizard and choose to remove all files. - Delete the VirtualBox configuration folder
Press Windows + R, type%USERPROFILE%\.VirtualBox, and press Enter. Delete this entire folder. This removes old settings and caches that might interfere with a fresh install. - Download the latest VirtualBox installer
Visit virtualbox.org/wiki/Downloads and download the Windows host installer for the latest stable version. - Run the VirtualBox installer
Double-click the downloaded .exe file. ChooseNexton each screen, accept the license, and let it install to the default location. - Download the matching Extension Pack
After VirtualBox installs, download the Extension Pack for the same version you just installed. The filename must match the VirtualBox version exactly. - Install the Extension Pack immediately
Double-click the .vbox-extpack file (or use File > Tools > Extension Pack Manager > Add in VirtualBox). Follow the prompts to install it. - Restart the Windows 11 host
A full reboot ensures all drivers and services load correctly with the new VirtualBox installation. - Start your virtual machine and configure USB
Boot the VM. Go to Settings > USB, enable the USB Controller, and select USB 2.0 or 3.0 as appropriate. Click OK and test device attachment.
Enable EFI and Add USB Device Filters Advanced
- Power off the virtual machine completely
Do not save state; shut it down fully. - Open the VM Settings and navigate to System
Right-click the VM, selectSettings, then clickSystemin the left sidebar. - Check the Motherboard tab
UnderBoot Order, look for a checkbox labeledEnable EFI (special OSes only). If using USB 3.0 devices, tick this box. EFI firmware handles USB 3.0 more reliably on some hardware. - Click OK and return to Settings > USB
Now clickUSBin the sidebar. - Ensure USB Controller is enabled and set to USB 3.0
CheckEnable USB Controllerand set the dropdown toUSB 3.0 (xHCI) Controller. - Add a USB device filter
Below the USB Controller dropdown, you'll see a section for USB Device Filters. Click the button with a plus icon (+) next toUSB Device Filters. - Select your specific USB device from the list
A dialog appears showing connected USB devices. Click your device to select it, then click OK. VirtualBox now creates a filter that auto-attaches this device when the VM boots. - Click OK to save all settings
The filter is now active. - Boot the VM and verify the device is attached
Start the guest OS. Open Device Manager in the guest and check if your USB device appears under Universal Serial Bus controllers. It should be there automatically.
Install Guest Additions and Run System File Checker Advanced
- Boot the Windows 11 guest OS
Start the VM normally and log in. - Go to the Devices menu in VirtualBox
At the top of the VirtualBox window, clickDevices. - Select Insert Guest Additions CD Image
This mounts a virtual CD containing driver and utility software for the guest. A dialog may appear in the guest asking to run the installer automatically. If so, clickRun. If not, open File Explorer and browse to the CD drive, then double-clickVBoxWindowsAdditions.exe. - Follow the Guest Additions installer wizard
ClickNexton each screen. The installer will copy files and may ask to reboot. Allow it to reboot the guest when prompted. - After the guest reboots, open Command Prompt as Administrator
In the Windows 11 guest, search forcmd.exe, right-click it, and selectRun as administrator. - Type the system file checker command
Type this command and press Enter:sfc /scannow. This scans the guest OS for corrupted system files and repairs them automatically. It takes 10-15 minutes to complete. - Wait for the scan to finish and reboot if prompted
The command window will show the progress. Let it finish completely. If it finds and repairs files, reboot the guest. - Return to the VirtualBox USB menu and test attachment
After the guest reboots, click the USB icon in the VirtualBox status bar and select your device. It should now attach and function correctly in the guest.
Is Your Problem Actually Data Corruption?
If USB devices aren't being detected in VirtualBox, one risk is losing access to files stored on external drives. If you've been unable to access critical data on a USB device or external hard drive because of this detection failure, and you suspect files may be corrupted or lost, specialist recovery software becomes necessary. The fixes above restore device detection, but they won't recover files that were already inaccessible or damaged. If you need to retrieve data from a problematic USB drive after restoring VirtualBox USB detection, that's a separate task requiring dedicated recovery tools.
Preventing VirtualBox USB Detection Issues on Windows 11
Most of these problems are preventable if you set up VirtualBox correctly from the start. Here's what to do:
- Install the Extension Pack immediately after VirtualBox. Don't create any VMs until it's in place. Make it a habit: VirtualBox > reboot > Extension Pack > then build VMs. This eliminates 60% of USB problems before they start.
- Enable USB Controller during VM creation. When you set up a new virtual machine, go straight to the USB section in Settings and enable it. Choose USB 2.0 unless you specifically need USB 3.0. It's easier to enable it early than troubleshoot why it's missing later.
- Check for VirtualBox updates monthly. Major updates sometimes improve Windows 11 compatibility. Visit virtualbox.org occasionally and compare your installed version with what's current. If you're more than one minor version behind, upgrade both VirtualBox and the Extension Pack together.
- Keep USB drivers current on the Windows 11 host. Open Device Manager quarterly and look for any devices with error icons. If Windows Update hasn't pushed new USB controller drivers, manually download them from your motherboard or chipset manufacturer's website.
- Never unplug USB devices whilst the VM is running. Always use the VirtualBox USB menu to detach devices first. Just yanking the cable can corrupt the virtual machine's USB state and break detection entirely.
- Test USB functionality before you need it. Create a small test file on a USB drive, attach it to the VM, and verify you can read it. Do this once after setup, not when you're in a rush to transfer important files.
- Use USB 2.0 unless you have a specific reason not to. USB 3.0 requires the Extension Pack and occasionally needs EFI firmware enabled. Stick with USB 2.0 for simplicity and maximum compatibility. Upgrade only if file transfers are too slow or your device requires USB 3.0 speed.
VirtualBox USB Detection Windows 11 Summary
VirtualBox USB detection Windows 11 fails when three components aren't aligned: the Extension Pack, the USB Controller setting, and host drivers. Start with the quick fix of restarting and enabling USB Controller. If that doesn't work, download and install the matching Extension Pack from virtualbox.org. Check Windows Device Manager for driver errors and reinstall USB drivers if you find any. If nothing works after that, update VirtualBox itself, enable EFI firmware for USB 3.0, and install Guest Additions in the Windows 11 guest. Most issues resolve with one of these steps. The key is doing them in order and verifying each step before moving to the next. If you're consistently hitting USB problems, set up new VMs with the Extension Pack and USB Controller enabled from the start. It saves hours of troubleshooting down the line.