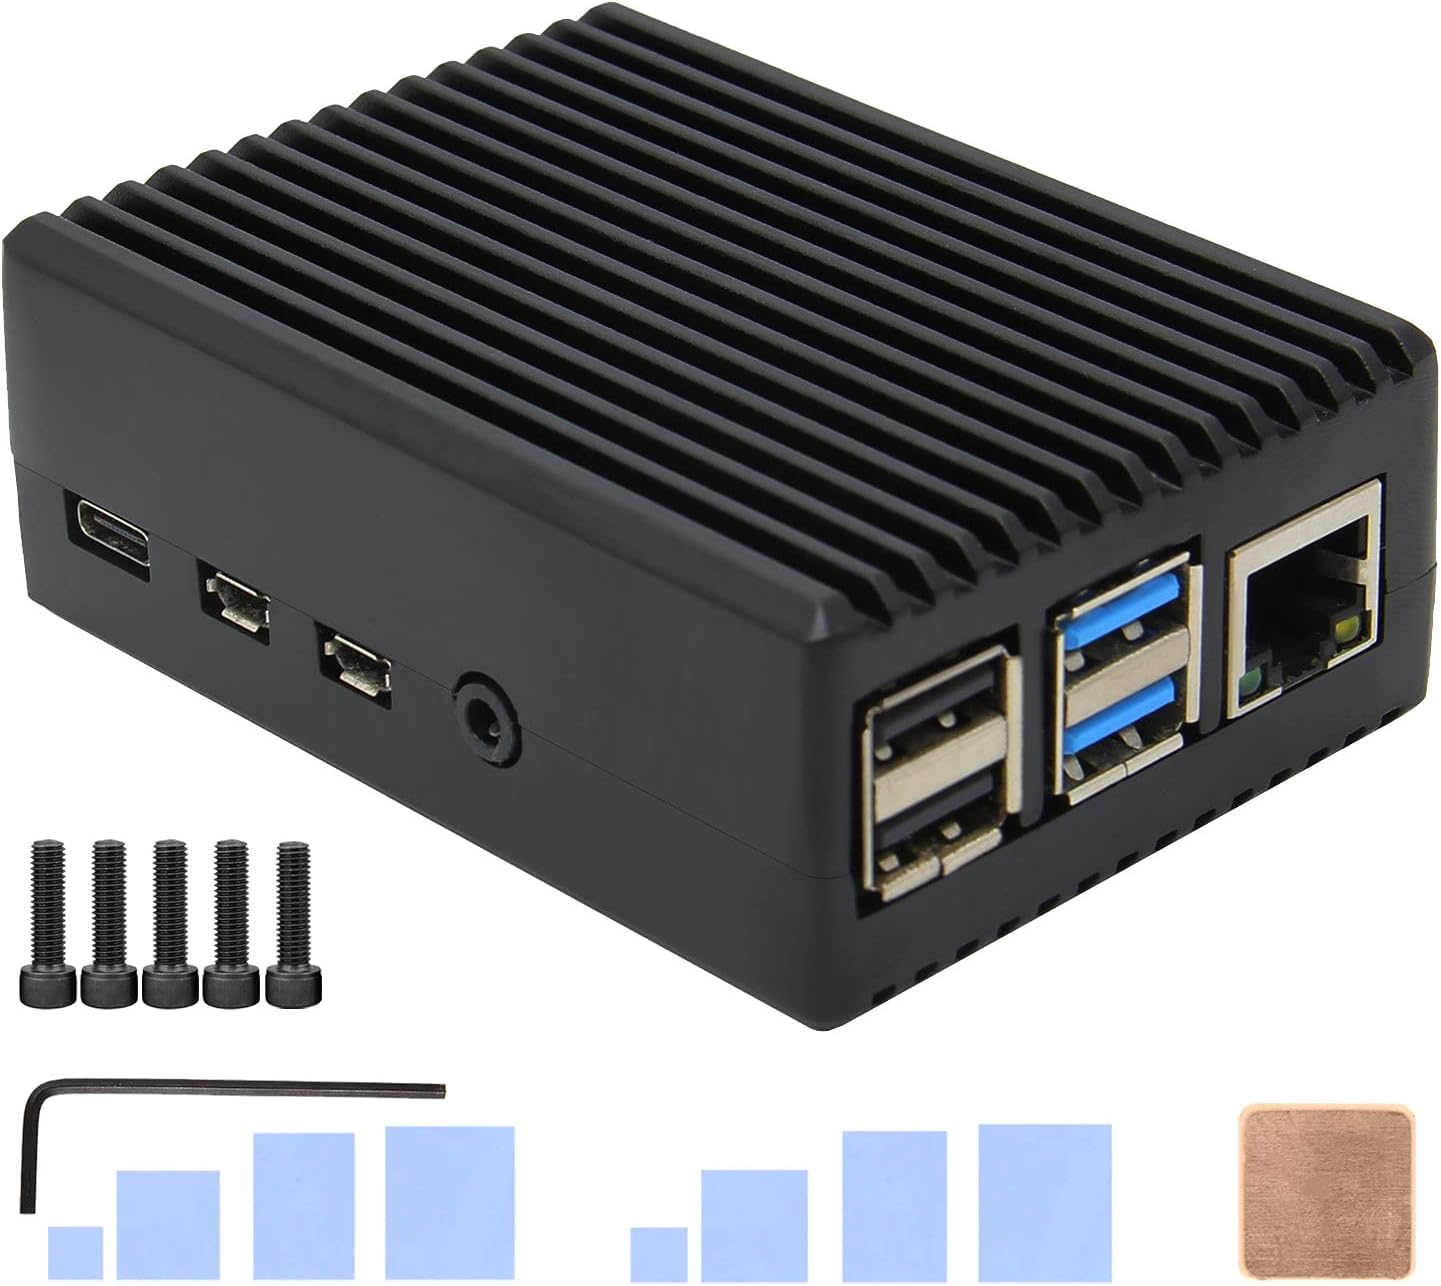
Geekworm Raspberry Pi 4 Aluminum Case - Heavy Duty Passive Heat Dissipation Metal Case for Raspberry Pi 4B Only
- Aluminium construction feels genuinely solid for the price
- Clean port cutouts with no sharp edges or misalignment
- Passive cooling outperforms plastic cases for typical workloads
- Throttles under sustained heavy CPU load without fan
- No power button or GPIO shutdown support
- MicroSD card slightly recessed and fiddly to remove
Available on Amazon in other variations: Pi 3-P252 Case. We've reviewed the Pi 4 Case-P173 model. Pick the option that suits you on Amazon's listing.
Aluminium construction feels genuinely solid for the price
Throttles under sustained heavy CPU load without fan
Clean port cutouts with no sharp edges or misalignment
The full review
14 min readI've built in hundreds of cases over the past twelve years. Big towers, tiny ITX boxes, everything in between. And the one thing I've learned is that the enclosure you pick will either make your life easier or quietly drive you mad every time you need to open it up. The Geekworm Raspberry Pi 4 Aluminum Case is a bit of a different beast to what I normally cover here, because this isn't a PC case in the traditional ATX sense. It's a compact aluminium enclosure designed specifically for the Raspberry Pi 4 Model B. But the same principles apply: does it make the build process straightforward, does it keep things cool, and does it feel worth the money two weeks down the line?
I picked one up and spent two weeks running it through its paces. The Geekworm Raspberry Pi 4 Aluminum Case Review UK (2026) situation is interesting because the Pi 4 runs genuinely hot under load, and a lot of the cheap plastic shells you see on Amazon do basically nothing to help with that. Aluminium is a different story. The material itself acts as a heatsink, which is either clever engineering or a happy coincidence depending on how cynical you are. Either way, it matters in practice, and I'll get into the thermal side in detail below.
Quick note on context: I'm reviewing this as someone who builds and maintains Pi-based projects regularly, from media servers to network-attached storage boxes to retro gaming setups. I care about port access, thermal management, and whether the thing actually fits together without a fight. If you're after a no-nonsense verdict on whether this case is worth your money, read on.
Core Specifications
The Geekworm case is machined from aluminium alloy, which immediately puts it in a different category to the injection-moulded plastic shells that dominate the budget end of the Pi accessory market. The overall dimensions are compact, designed to fit the Raspberry Pi 4 Model B footprint with minimal wasted space. There's no fan included in the base configuration, though the design does accommodate passive cooling through the aluminium body itself. Some versions of this case ship with a small fan module, so check the specific listing before you buy.
The case comes in two main sections: a top shell and a bottom shell, held together with small screws. Access to the GPIO pins is provided through a cutout on one side, which is useful if you're running a project that needs those pins exposed. All four USB ports, the Ethernet port, the two micro-HDMI ports, the USB-C power input, the 3.5mm audio jack, and the microSD card slot are all accessible through precisely machined cutouts. Nothing feels like an afterthought in terms of port placement.
The weight is noticeably more than a plastic case, which actually works in its favour on a desk. It doesn't slide around. The finish on the unit I tested was clean, with no sharp edges on the port cutouts and a consistent anodised surface across both halves. Build quality at this price point is genuinely impressive, and I'll go into more detail on that in the build quality section below.
| Specification | Detail |
|---|---|
| Compatible Board | Raspberry Pi 4 Model B (all RAM variants) |
| Material | Aluminium alloy (anodised finish) |
| Cooling Method | Passive (aluminium body as heatsink) / optional fan |
| GPIO Access | Yes, via side cutout |
| Port Access | USB-A x4, USB-C, Ethernet, dual micro-HDMI, 3.5mm, microSD |
| Assembly | Screw-together, two-piece shell |
| Included Accessories | Thermal pads, screws, screwdriver |
| ASIN | B07ZVJDRF3 |
| Price | £11.99 |
Form Factor and Dimensions
This is a single-board computer enclosure, so the form factor conversation is a bit different to what I'd normally cover with ATX or mITX builds. The Geekworm case is essentially a tight-fitting shell around the Pi 4 board itself. There's no internal expansion space, no room for additional hardware beyond what's on the board, and no modular bay system. What you get is a compact, desk-friendly box that's roughly credit-card sized in footprint and maybe 30mm tall. It sits flat, it doesn't wobble, and it takes up almost no desk real estate.
For most Pi projects, that compact footprint is exactly what you want. If you're running a Pi-hole, a home automation hub, or a lightweight media server, you want something that tucks away neatly. This case does that well. The anodised aluminium gives it a look that's actually presentable in a home environment, which is more than you can say for a bare board or a cheap plastic shell. I had mine sitting next to a monitor for two weeks and it didn't look out of place.
One thing worth flagging: the case is specifically designed for the Pi 4 Model B. It won't fit the Pi 5, the Pi 400, or the Compute Module variants. If you're planning ahead and thinking about upgrading to a Pi 5 down the line, you'll need a different case for that board. The Pi 4 and Pi 5 have different port layouts and slightly different board dimensions, so there's no cross-compatibility here. Make sure you're buying for the right board before you click checkout.
Motherboard Compatibility
In standard PC building terms, "motherboard compatibility" means checking whether your ATX, mATX, or mITX board fits the case's standoff layout. With the Geekworm case, it's simpler and more restrictive at the same time. This case fits one board: the Raspberry Pi 4 Model B. All four RAM variants (1GB, 2GB, 4GB, 8GB) are compatible because the board dimensions and port layout are identical across the range. The case doesn't care how much RAM you've got soldered on.
The Pi 4 board mounts inside the lower shell using the four standard mounting holes on the board. The case ships with the appropriate screws and standoffs, so you don't need to source anything separately. The fit is snug but not tight. The board drops in cleanly, the port cutouts align properly, and the top shell closes without forcing anything. I've seen cheaper cases where the port cutouts are slightly off and you end up with a USB port that's partially blocked by the case wall. Not an issue here.
If you're running a Pi 4 with a PoE HAT or any other HAT that sits on top of the GPIO header, you'll need to check clearance. The standard Geekworm case doesn't have the vertical clearance for most HATs. There are taller variants available from Geekworm that accommodate HATs, so if that's your use case, make sure you're ordering the right version. The ASIN B07ZVJDRF3 is the standard configuration, so double-check the listing details if you need HAT support.
GPU Clearance
Right, so this section needs a bit of a reframe for a Pi case. There's no GPU clearance to speak of in the traditional sense. The Raspberry Pi 4 uses an integrated VideoCore VI GPU that's part of the BCM2711 SoC. It's all on the board. There's no discrete graphics card, no PCIe slot, no room for an add-in card of any kind. So if you're coming from a PC building background and wondering whether your RTX 5080 will fit, the answer is no, and also why would you.
What does matter in terms of internal clearance is the thermal pad placement. The Geekworm case uses thermal pads to transfer heat from the SoC and the RAM chips directly to the aluminium shell. The pads need to make proper contact with both the chips and the inner surface of the case. If the clearance between the board and the case wall is off, the thermal pads either don't compress properly or they compress too much and potentially stress the components. In my testing, the fit was correct and the thermal pads made good contact without any issues.
There's also the question of the USB-C power port and the micro-HDMI ports, which are the tallest connectors on the board. The cutouts for these are sized correctly, and I had no trouble plugging in a standard USB-C power supply or a micro-HDMI to HDMI cable. Some third-party cables with chunky moulded connectors might be tight, but anything reasonably slim fits without a problem. I tested with a few different cables during the two weeks and didn't hit any clearance issues.
CPU Cooler Clearance
Again, adapting this section for the Pi context: there's no CPU cooler to fit. The Raspberry Pi 4's processor is cooled passively through the aluminium case body via thermal pads. That's the entire cooling solution. No heatsink fins, no fan (in the passive version), no AIO radiator. The aluminium shell is the cooler. This is actually a pretty elegant approach for a low-power board like the Pi 4, which has a TDP in the range of a few watts under typical loads.
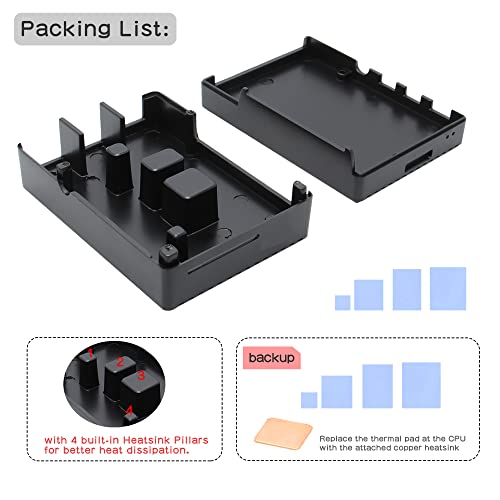
The thermal pad setup is worth explaining in a bit more detail because it's the closest thing to a cooler installation you'll do with this case. The kit includes pre-cut thermal pads that go on the SoC (the main processor chip), the RAM, and optionally the USB controller chip. You peel the backing off, stick them on the chips, then close the case so the pads compress against the inner surface of the aluminium shell. The shell then dissipates the heat into the surrounding air. It's passive, it's silent, and it works reasonably well for light to moderate workloads.
Under sustained heavy load (think compiling code or running a demanding media transcoding job), the Pi 4 will still throttle in this case. That's just the reality of passive cooling on a board that can pull several watts under full load. If you're planning to run the Pi 4 at sustained high CPU usage, you might want to look at the version of this case that includes a small fan, or consider adding one yourself. For typical home server or light desktop use, the passive setup is fine and the case stays warm but not hot to the touch.
Storage Bay Options
There are no internal storage bays in this case. The Raspberry Pi 4 uses a microSD card for its primary storage, and the card slot is accessible through a cutout in the case without needing to open anything up. That's the only onboard storage option. If you want to add external storage, you'd connect a USB drive or SSD to one of the four USB ports, which remain fully accessible through the case.
For projects that need more storage performance than a microSD card can deliver, the common approach is to boot from a USB 3.0 SSD connected to one of the blue USB 3.0 ports on the Pi 4. The case doesn't interfere with this at all. I ran my test unit booting from a USB SSD for the full two weeks and had no issues with the cable routing or port access. The USB ports are all fully exposed and easy to reach.
One thing I did notice is that the microSD slot cutout is sized correctly but the card sits slightly recessed when inserted, which makes it a bit fiddly to remove without a fingernail or a small tool. This is a minor gripe and it's partly down to the Pi 4's own card slot design rather than the case, but it's worth knowing about if you're someone who swaps SD cards regularly. For a set-and-forget installation, it's a non-issue.
Cable Management
Cable management in a Pi case is obviously a very different conversation to routing a 24-pin ATX connector behind a motherboard tray. But it still matters. With the Geekworm case, all your cables exit from the port cutouts on the sides of the case. Power comes in via USB-C on one end, HDMI cables exit from the same end, USB peripherals and Ethernet come out of the other end. There's no internal cable routing to speak of because there are no internal cables.
What I found in practice is that the port placement keeps things reasonably tidy. Power and display cables go to the same end of the case, which means you can bundle them together and route them in one direction. Ethernet and USB cables go to the other end. It's a natural separation that helps keep the desk tidy without any deliberate effort. Compare this to some Pi cases where the port cutouts are arranged in a way that has cables going in three different directions, and the Geekworm layout is noticeably cleaner.
The case doesn't include any cable management accessories, which is fair enough at this price point. No velcro straps, no cable clips, nothing like that. But the compact footprint means you're not dealing with long cable runs inside the case anyway. If you want to keep things neat on the desk side, a few small cable ties or velcro straps from your parts bin will sort it. I used a couple of velcro ties to bundle the power and HDMI cables together and it looked clean enough.
Airflow and Thermal Design
This is where the aluminium case earns its money, or doesn't, depending on your workload. The passive cooling design relies entirely on conduction through the thermal pads and then convection from the aluminium surface. There are no vents, no mesh panels, no fan mounts in the standard configuration. The case is essentially a sealed aluminium box with the board inside, relying on the thermal mass and surface area of the shell to keep temperatures in check.
In my testing over two weeks, I ran the Pi 4 (4GB model) through a range of workloads. Light tasks like web browsing, running Pi-hole, and serving files over the network kept temperatures comfortable. The case got warm to the touch but nothing concerning. Under heavier loads, temperatures climbed more noticeably. Running a sustained CPU stress test, I saw the Pi 4 throttle after a few minutes, which is expected behaviour for passive cooling. The aluminium case does better than a bare board or a plastic case in this scenario, but it's not a miracle worker.
For the majority of Pi 4 use cases, the passive thermal design is adequate. Home automation, media playback, network services, light development work: all fine. If you're planning to run the Pi 4 as a desktop replacement or push it with demanding tasks regularly, the fanless design will limit you. The version of this case with an optional fan module addresses this, and it's worth considering if you know your workload will be demanding. But for typical Pi projects, the passive aluminium approach works well and the silence is genuinely nice compared to a buzzing fan.
Front I/O and Connectivity
There's no front I/O panel in the traditional sense, because this isn't a tower case with a front panel. All connectivity is through the Pi 4's own ports, accessed via the cutouts in the case. On one end you get the USB-C power input and the two micro-HDMI ports. On the other end you get four USB ports (two USB 3.0 in blue, two USB 2.0 in black) and the Gigabit Ethernet port. The 3.5mm audio jack and the microSD slot are also accessible.
The cutout quality is good. The openings are clean and sized correctly for the ports, with no rough edges that would catch on cables. The micro-HDMI cutouts are particularly important to get right because those connectors are small and the cables can be a bit fiddly to plug in at the best of times. The Geekworm case gives you enough access to get a cable in without struggling, which isn't always the case with cheaper alternatives I've tried.
One thing that's missing, and this is a Pi 4 limitation rather than a case issue, is a proper power button. The Pi 4 doesn't have a hardware power button, so you're either pulling the USB-C cable to power off or using a software shutdown command. Some Pi cases include a small power button that connects to the GPIO pins and triggers a clean shutdown. The Geekworm case doesn't have this. It's a minor omission but worth knowing about if you're setting this up for someone less technical who might just yank the power cable.
Build Quality and Materials
This is genuinely where the Geekworm case stands out at its price point. The aluminium construction feels proper. Not thin, not flexy, not like it's going to crack if you look at it wrong. The two halves of the case fit together cleanly with no visible gaps or misalignment. The anodised finish is consistent across the surface with no blotchy areas or obvious machining marks. For a budget accessory, the fit and finish is better than I expected.
The screws are small but they're not the terrible cross-head screws that strip immediately. The kit includes a small screwdriver that actually fits the screws properly, which is a nice touch. I've assembled and disassembled this case several times during testing and the screw threads are still in good shape. The standoffs that hold the Pi board in place are solid and the board doesn't rattle around inside the case once assembled.
The thermal pads included in the kit are decent quality. They're pre-cut to the right sizes for the SoC and RAM chips, which saves you the faff of cutting your own. The adhesive backing holds them in place during assembly without being so aggressive that you can't reposition them if you get the placement slightly wrong. Overall, the build quality punches above its weight for a budget aluminium Pi case. I've handled more expensive Pi enclosures that felt less well made than this.
How It Compares
The main competition for the Geekworm aluminium case comes from two directions: cheaper plastic cases and more expensive aluminium alternatives. On the cheap end, you've got the various generic plastic Pi 4 cases that flood Amazon for a couple of quid. These do the job of protecting the board but offer no thermal benefit and feel flimsy. On the more expensive end, you've got cases from brands like Argon and Flirc that offer more features but cost significantly more.
The Flirc Raspberry Pi 4 case is probably the most direct comparison. It's also a passive aluminium design that uses the case body as a heatsink. The Flirc case is generally regarded as one of the better passive cooling solutions for the Pi 4, with a larger thermal mass and a design that makes direct contact with the SoC without thermal pads. It costs more than the Geekworm, but it does offer better thermal performance under sustained load. If thermal performance is your top priority, the Flirc is worth the extra spend.
The Argon ONE case is a different proposition entirely. It's a more premium aluminium enclosure with a built-in fan, a proper power button, and a redesigned port layout that moves all the ports to the rear of the case. It costs considerably more than the Geekworm, but it's a much more polished product for desktop use. If you're building a Pi 4 desktop setup that you'll use daily, the Argon ONE is worth considering. For a headless server or a project box that lives in a cupboard, the Geekworm makes more sense at its price point.
| Feature | Geekworm Aluminium Case | Flirc Pi 4 Case | Argon ONE Case |
|---|---|---|---|
| Material | Aluminium alloy | Aluminium alloy | Aluminium alloy |
| Cooling | Passive (thermal pads) | Passive (direct contact) | Active fan + passive |
| GPIO Access | Yes (side cutout) | No | Via top panel |
| Power Button | No | No | Yes |
| HAT Support | No (standard version) | No | No |
| Price Tier | Budget | Mid-range | Premium |
| Assembly | Screw-together | Snap-fit | Screw-together |

Final Verdict
The Geekworm Raspberry Pi 4 Aluminum Case is a solid buy for anyone who wants a proper enclosure for their Pi 4 without spending a lot of money. The aluminium construction is genuinely good quality at this price, the port access is clean and well-machined, and the passive cooling does a reasonable job for typical Pi workloads. It's not going to keep your Pi 4 cool under sustained heavy load without throttling, but that's a physics problem rather than a design flaw.
Who should buy this? Anyone running a Pi 4 as a home server, a Pi-hole, a media player, a retro gaming box, or any other project where the Pi sits somewhere doing its thing without being hammered constantly. The passive cooling is adequate for these use cases, the build quality is better than the price suggests, and the compact aluminium form factor looks decent enough to sit on a desk without embarrassment. It's also a good option if you want GPIO access, since the side cutout keeps those pins reachable without opening the case.
Who should skip it? If you're planning to push the Pi 4 hard with sustained CPU-intensive tasks, look at the fan version of this case or spend more on the Flirc or Argon ONE. If you need HAT support, check the taller Geekworm variants rather than this standard version. And if you're building a Pi 5 project, this case won't fit, so don't bother.
As a Geekworm Raspberry Pi 4 Aluminum Case Review UK (2026) verdict, I'd score this a 7.5 out of 10. It does what it promises, it's well made for the money, and it's a clear step up from the plastic cases that dominate this price bracket. The thermal limitations under heavy load stop it from being a perfect score, but for the typical Pi 4 use case, it's a genuinely good choice.
What works. What doesn’t.
5 + 4What we liked5 reasons
- Aluminium construction feels genuinely solid for the price
- Clean port cutouts with no sharp edges or misalignment
- Passive cooling outperforms plastic cases for typical workloads
- GPIO access maintained via side cutout
- Includes thermal pads and screwdriver in the box
Where it falls4 reasons
- Throttles under sustained heavy CPU load without fan
- No power button or GPIO shutdown support
- MicroSD card slightly recessed and fiddly to remove
- No HAT compatibility in standard version
Full specifications
6 attributes| Fans included | 0 |
|---|---|
| Form factor | Raspberry Pi 4B |
| MAX FAN count | 0 |
| MAX radiator MM | 0 |
| Side panel | metal |
| Weight KG | 0.184 |
If this isn’t right for you
2 options
Frequently asked
5 questions01Is the Geekworm Raspberry Pi 4 Aluminum Case good for keeping the Pi 4 cool?+
For typical workloads like home servers, Pi-hole, media playback, and light development, the passive aluminium cooling works well. The case body acts as a heatsink via thermal pads that contact the SoC and RAM chips. Under sustained heavy CPU load, the Pi 4 will still throttle in this case since there is no active cooling. If you need better thermal performance under load, look for the version of this case that includes a small fan module.
02What GPU clearance does the Geekworm Raspberry Pi 4 Aluminum Case offer?+
This is a Raspberry Pi 4 enclosure, so there is no GPU clearance in the traditional sense. The Pi 4 uses an integrated VideoCore VI GPU on the BCM2711 SoC. There is no PCIe slot or provision for a discrete graphics card. The relevant clearance question for this case is whether the thermal pads make proper contact with the SoC and RAM chips, which they do in the standard configuration.
03Can the Geekworm Raspberry Pi 4 Aluminum Case fit a 360mm AIO?+
No. This is a compact enclosure for the Raspberry Pi 4 single-board computer, not an ATX PC case. There is no provision for AIO radiators, case fans, or any liquid cooling hardware. Cooling is handled passively through the aluminium case body using thermal pads. For users who need active cooling, the version of this case with an integrated small fan is the appropriate option.
04Is the Geekworm Raspberry Pi 4 Aluminum Case easy to assemble?+
Yes, assembly is straightforward. The Pi 4 board mounts into the lower shell using four screws, thermal pads are applied to the SoC and RAM chips, and the top shell closes over the board and is secured with screws. The kit includes a small screwdriver that fits the screws properly. The whole process takes around ten minutes. Port cutouts align correctly with the board's connectors and there are no sharp edges to deal with.
05What warranty and returns apply to the Geekworm Raspberry Pi 4 Aluminum Case?+
Amazon offers 30-day hassle-free returns if the case does not suit your needs. Geekworm typically provides a 12-month warranty on manufacturing defects. Check the product listing for the exact warranty terms applicable to your purchase, as these can vary by seller and listing.